Your Tesla is already a pretty smart vehicle, and getting more intelligent all the time. Despite the many onboard smart features within the Tesla, some people still look to other products and services to provide additional controls and features that enhance their driving experience.
One product that has been making the rounds in the past year has been the Amazon Echo Auto. Amazon’s Echo equipped with Alexa has proven to be one of the most popular home-based AI systems, and the Echo Auto brings that functionality to your car. In today’s blog, we’ll be looking first at how to install and use the Amazon Echo Auto in your Tesla, and then looking at some of the pros and cons of Amazon’s latest car gadget.
What is Amazon Echo Auto? What Can It Do?
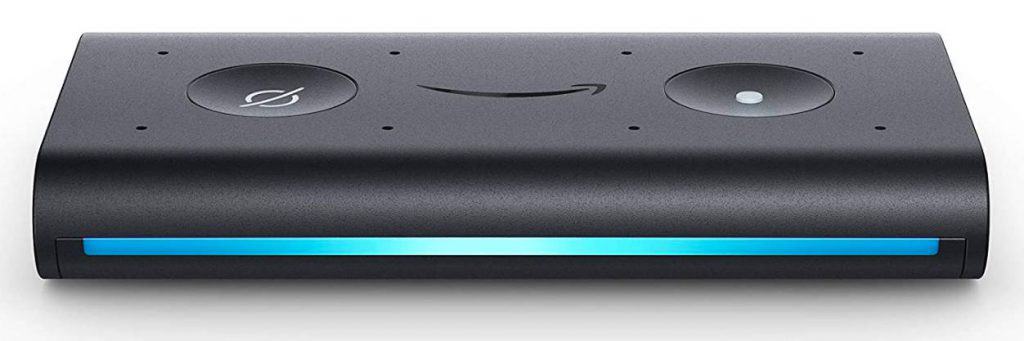
Amazon Echo Auto is a very compact unit, and comes in its box along with some basic peripherals: an adhesive attachment that clips into the back of the unit to allow you to stick it to the car’s dashboard surface; an aux cable; a USB power cable and a plug-in attachment with dual USB ports.
Main Unit
The main Echo Auto unit is very compact, like a smaller version of a portable charger pack. On the side you’ll see ports for the USB power cable, as well as the auxiliary cable. On the top you’ll see just two buttons. The right-hand button manually activates the Alexa alert function — the function you would normally activate by saying “Alexa” — and the left button mutes the microphone so it won’t pick up your voice.
Main Functions
Once set up properly (see below), the device can be used in many different ways. First, you can use it to control your onboard media like music and radio stations. With simple voice commands like “Alexa, play music” or “Alexa, play Sonic 102.9 on tune-in radio,” or simply search by artist, song name or playlist name to get your music going.
You can also use it for making phone calls by asking Alexa to call a contact by name or number. If you’ve got your music playing, it will automatically lower the volume of the music to allow you to speak with Alexa and to hear your commands, “Alexa, what’s the weather?” or “Alexa, call Mom.”
Another function that the Echo Auto boasts is the ability to control your smart devices at home. If you are almost home and want to activate one of your smart devices in advance, you can do so with a simple voice command as long as you remember the name of the device as stored in your Amazon paired devices. You can also switch off any devices that you forgot about remotely.
In terms of productivity, the Echo Auto allows you to:
- Make shopping lists
- Add items to your calendar
- Make navigation requests
- Have the device read your books to you
- Along with reading out traffic information on your normal routes…
- … and much more.
Essentially, anything that your phone knows can be transmitted through the Amazon Echo Auto. How do you set up this device? We’ll cover that in the next section.
How to Install Amazon Echo Auto in Your Tesla
Installation and setup of the Amazon Echo Auto is mercifully simple in any car, even in a Tesla which has been resistant to many other smartphone connectivity platforms like Apple CarPlay, for instance. Since this is hardware, it’s really just a case of plugging in and then syncing with your smartphone, we’ll explain step-by-step below:
Step 1: Unboxing the Amazon Echo Auto
The package is quite small and compact. Simply remove the items from the box and ensure that everything you need is there. See above for what should be in the box. In short: the main Echo Auto unit, an aux cable, a USB power cable, an adhesive back mount, and a 12-volt plug-in unit with dual USB ports. There should also be a card with suggested prompts to help you get the most out of Alexa’s voice command features.
At this unboxing stage, do not remove the protective plastic back from the adhesive back mount. The surface is very sticky so you’ll want to keep it clean and untouched until you’re ready to put it into position. If you want and assuming you’re going to use that adhesive amount as opposed to a magnetic dash mount (which also works), you can clip it into place on the back of the main unit first without removing that plastic cover.
Step 2: Plug In to the USB Port
Open up the central storage compartment in the center stack and plug your USB into an available port. If you already have other things plugged in, you should consider getting a USB port with 4-5 additional outlets to use. Once you’re plugged in, you’re ready to move on to step 3.
Step 3: Feeding and Looping the Cable
The next stage can be a little fiddly, but it’s an important one to get the ideal position that doesn’t clutter up your Tesla with unsightly cables and other gear. Teslas were built as these sleek, ergonomic machines where you’re supposed to be able to conceal the electronic guts that make many cars so messy-looking.
Carefully feed the power cable up through the side of the storage lid — you should be able to close it safely over the cable – behind the central touchscreen and up onto the dashboard. Now you’re ready to position the Echo Auto where you want on the dashboard.
Step 4: Stick Echo Auto in Place
For this guide, we’re going to assume that you’re using the factory-issued adhesive mount. By now, the mount should be clipped on and now you just have to place it somewhere where you can easily connect your newly and neatly routed cable that is hidden to the best of your ability.
Obviously, you can place it where you want, but it seems there are two obvious choices that make the most sense. The first is to place the unit just behind your steering wheel and feed the cable along the dash to plug in. This puts you in easy reach of the mute button and the manual activation button if and when you need them.
The second option, and the one most in keeping with the car’s aesthetic, is to place it behind the central touchscreen. This means that the device is out of sight but can still easily be activated with voice commands. The only downside to this is that the buttons are more awkward to reach if you need them.
The video below explores another potential mounting option:
So those are the simplest choices on where to place it, but you can stick it anywhere you think looks or works best for you, of course.
Step 5: Activate and Pair
The next step is to power up the Echo Auto and pair it with your smartphone on the Alexa app. The controls are fairly intuitive, but we’ll still go through the basic process, using the iOS version as an example. Make sure your Bluetooth is on, and there should be an orange/amber light showing up on your Echo Auto unit.
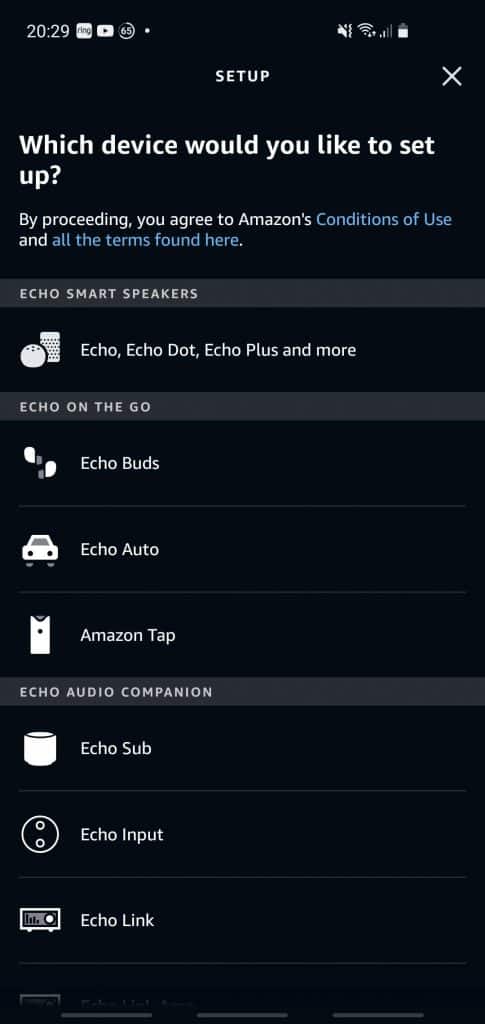
Open up your Alexa app and hit the big plus button in the top right corner and then hit “Add Device.” Choose “Amazon Echo” and then scroll down to find Echo Auto:
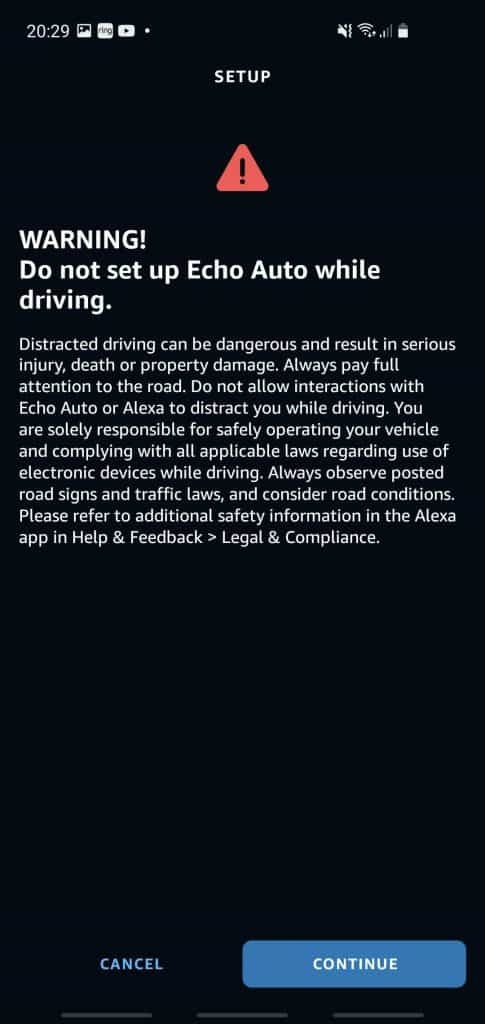
Next, navigate through the “Continue” options until you get to “Getting Started” – but be mindful of the warning in-case you are in your car right now:
With Bluetooth on, you should be able to see your Echo device there, hit that and then hit continue. It will then load up a setup screen and your iPhone will display a “Select an Accessory” window.
This part can take a couple of minutes so be patient. It’ll be blank for a while, but then eventually — sometimes even after 2 minutes — Echo Auto F120 (or whatever you previously clicked in the Bluetooth screen) will show up. Press on Echo Auto F120 and then follow the prompts all the way to the end of the setup, testing the sound, connecting to your car’s audio, and choosing your main account, etc.
Step 6: Start Using
At this point, you’re done! You can now start using the system. In the Tesla, there is one more important thing to note, which is that on your main touchscreen, you have to have your “Phone” feed active in order to hear the device responding to you. If you are on, say, “Streaming” then Alexa will hear you and respond, but it won’t play any sound via the Tesla onboard audio system.
What Are the Benefits that Amazon Auto Brings to Tesla Owners?
1. Connection to Home Devices
Tesla is already a pretty smart vehicle, but the main benefit of adding in your Amazon Bluetooth upgrade via the Echo Auto is that it connects you the driver to your Amazon-linked home more directly. The Tesla connects you and your car very well, but it’s not necessarily connected to those devices you’ve saved in your Alexa system.
Tesla does offer connection to smart devices in your home, but with Echo Auto, you can keep everything flowing through your Alexa app and not have to do anything within the separate Tesla system. That’s assuming that your Tesla does already connect to your chosen home system.
If your home is equipped with Amazon devices, then the Echo Auto is a great extension of these. For example, if you’re on the road and your family is at home, you can send a message from your car that broadcasts on your Amazon home devices.
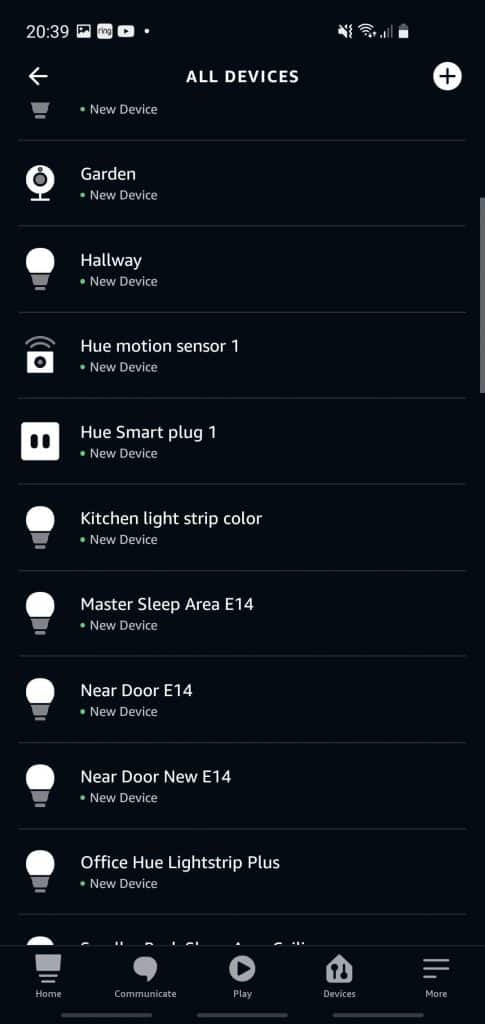
Alternatively you can manage your smart plugs, lighting and a whole lot more via the Alexa link:
2. Amazon Voice Recognition Strength
Alexa has very strong voice recognition technology. The device has been tested with the Tesla air conditioning sent to maximum strength — which can be pretty loud — and it still picks up voice and commands without a problem.
3. Makes Up for Spotify Bugs
Some Tesla drivers have long complained about problems with Spotify and other onboard apps in Tesla. The Amazon Echo Auto connects directly with your phone and then just uses the Tesla stereo, so things can operate quickly and smoothly when you’re using it.
What Are the Drawbacks of Amazon Auto in Your Tesla?
1. Only Works on Phone Connection – Basic
The first slightly annoying thing is that you have to be on your Phone connection to hear it and use it properly. If you click onto “Streaming” or any other feed, then it’s totally useless. In this sense, it’s actually lagging behind the more comprehensive suite of features that your Tesla already comes with.
The Echo Auto is recommended to many as a great Bluetooth upgrade for a somewhat older or more basic car. In that way it works great because it essentially connects your phone to the car and allows you to use it as a kind of proxy computer. Does Tesla really need that? Some would argue no.
2. Slow Start
When you get into your Tesla, you have to wait for a little time for the Echo Auto to connect to your phone before you can start using it. Tesla’s features, on the other hand, are all there for you right away from the startup. This lag doesn’t feel very futuristic or cutting-edge when you want to get going. It’s like waiting for a computer to boot up and it can take up to 30 seconds before you can start using it.
Conclusion: Amazon Echo Auto in Your Tesla – Is It Worth It?
Overall it seems that there is a net benefit to have Echo Auto in your Tesla. It doesn’t exactly boost your Tesla function, but what it does do is give you a better and more complete connection to your Amazon-based home system. Therefore, it makes the most sense to get this item if you are an Amazon Echo and Alexa user in your home as well. If you use different devices at home, then the Echo Auto will bring you nothing especially beneficial.
In addition, if your Tesla is already well connected to your home devices via whatever compatible system you are using, then that eliminates one of the chief benefits of this system, which is its connection to your home devices.
In the end, the decision will be yours.
1 comment
I use the Echo Auto on my 2021 M3P to open the smart garage door by voice, since I did not want to pay Tesla for the home link.